Wednesday, July 11, 2012

Chance meeting and a much needed slow Sunday.

I met a man at work recently. We have the same client and needed to attend a meeting together. General polite conversation quickly turned into a sharing of similar experiences of moving from Sydney to the countryside, with a nice mix of sustainable ideas and love for the home grown thrown in for good measure.

The term "blog" came up and he mentioned his wife had one. What?!? So excited. Someone living in the same area with very similar interests. Great!  I rushed home that evening to discover Little Green Village. What a gem to find! She has such similar interests to me: gardening, sewing, simple living.

So I sent her a "hello" package last week: broccoli seedlings raised by me, one of my winter tomato plants, home grown snow peas and chillies, and some eggs from my chooks. She loved it all and the very next day I got to meet her in person and gratefully received home grown lemon grass, rocket, and kaffir lime leaves. I have used the lemon grass in a stir fry and made a delicious rocket salad. Any ideas how I could use the kaffir lime leaves?

*   *   *  *   *   *   *   *
A slow Sunday.

~ Sophie ~

~ Fresh cut flowers ~

~ Spinning wool ~

~ A trip to the Farmers Market ~

Sam xox

Tuesday, July 10, 2012

The girls are laying.

About a month ago I went to my chook pen and found what looked like the remains of an exploded chicken - there were feathers everywhere!!! After doing an emergency head count (all girls accounted for) I turned to google for the possible cause of all these extra feathers.

Moulting. 

My chickens were moulting. A natural yearly cycle when chickens shed their old feathers and grow back some new ones. Usually this happens in autumn/winter. During this time chickens will stop laying until their new feathers have grown back.

So I waited patiently for a few weeks. I fed them treats of silverbeet, lettuce, and bread soaked in milk (as Rhonda recommends) and hoped for the eggs to return quickly.

This week we are back to almost full production.


Anyone for an omelette?


Sam xox

Tuesday, July 3, 2012

A thrifty nesting box.

Oxford and Cambridge needed a nesting box to sleep in, separate to the chooks. In the spirit of thrifty gardening, I searched the piles of off cuts we keep along the side of the house "just in case". I found a couple of thick timber pallet pieces, some white panelling, and the spare wire door the chicken coop originally came with. I found some screws and a couple of brackets, and set to work drop-sawing, cutting, and drilling. 

It was the first time I have ever used an electric saw, and goodness it was easier than hand sawing (which I did try first but our saw is very blunt). The frame came together easily with screws and brackets holding the timber firm.


I then measured out each side and cut out the white panelling accordingly. I kept the wired door as the floor of the box, as it is recommended to allow for easier cleaning as ducks can be a bit messy! The wire is smooth galvanized steel that is in no way going to damage the ducks feet. I added a half panel at the front so the ducks have a bit of privacy and warmth.


The box fitted perfectly beside the chickens nesting box. I removed a door from the coop frame to allow for the ducks to enter the box without trouble. I closed in the gap above their box with chicken wire to ensure the coop remained secure. The lid can be lifted to retrieve eggs (so long as that is where she lays them!).


I know it is all terribly white, but the painting will just have to happen another day. I am thinking a medium brown to match the timber of the hutch. While the panelling is sore on the eye, we have found it to be incredibly weather proof, and has held up well during the recent rainy months.


I filled up the nesting box with straw so that Oxford and Cambridge are warm and comfortable while resting.


While I was on a DIY roll, I covered the wire hutch part with shade cloth I also had lying around. I secured the cloth with wire so that it won't move an inch. As the afternoon sun directly filters into the ducks nesting box, the shade cloth should provide perfect protection in the warmer months when the ducks are in there.

It feels good to make new structures for my garden out of bits and pieces just lying around the yard. I find making in this way to be a far more satisfying endeavour. Who cares if it looks a bit lop sided, and not quite straight.

It is sturdy. It fits perfectly. And it was made 100% by me.

Sam xox

Monday, July 2, 2012

Birds of a feather.


Recently I had been feeling guilty over the smallness of the run I had designed when I built my chickens' enclosure. Jamie and I mused about how the run could be expanded whilst not absorbing too much more of our yard. We decided to expand the run along the fence, enclosing a large bushy tree, mondo grass and a pond. I have read that chickens feel safe hiding in shrubs, so I figured the girls would enjoy hiding in the bushy bits near the pond.


You see, chickens don't find ponds very interesting (they don't like swimming!). But boy do ducks like ponds and swimming...


A Gumtree advertisement, one phone call and a half-hour drive, and we were in the presence of our new pet ducks. A breeding pair of Indian Runner ducks.


The white duck is male and the brown and white duck is female. She lays 5 eggs per week, and if we ever have a broody chicken we may be able to hatch some baby ducklings (though we have no plans to do this at the moment).


We have named them Oxford (male) and Cambridge (female). Cambridge is already laying and her eggs are larger than those the chooks produce. Speaking of the chooks, they hardly bat an eye lid when Oxford and Cambridge were introduced to the run. Honestly, I was anticipating some sort of territorial display or intimidation behaviour, but nothing happened. The chooks were more interested in their food and the ducks more interested in the pond!


I honestly don't know why we didn't get ducks sooner. They have the most beautiful nature and don't tear up the grass like chickens do. They absolutely LOVE their pond, and spent most of their first afternoon swimming around in the water, duck diving down (the pond is deep enough!) and eating what they could find on the pond floor.

They needed their own living quarters though, so I spent today making a very thrifty nesting box. But more about that tomorrow.

Sam xox

Sunday, July 1, 2012

In the garden.

~ Mint growing wild ~

~ Garlic cloves planted from Australian grown organic garlic bulbs ~

~ Potatoes ~

~ Silverbeet ~

~ Broccoli & peas ~

~ Peas ~

Sam xox

Thursday, June 28, 2012

Tomatoes in winter.

I think it was in Episode two of "The Edible Garden" (BBC) that Alys Fowler builds a greenhouse using repurposed 1930's lead light windows, in the hope that she would be able to grow a tomato plant that could be kept safe from blight.
 ~ Just on a side note - I would just love to find some windows like this and do the same ~

The idea stayed with me, and in autumn I got to thinking... what if I could use my greenhouse to grow a tomato plant in winter? What if I could eat home grown tomatoes all year round?

A crop of tomatoes that flourished beyond measure over the summer time meant that I now had lots of tiny tomato plants sprouting all over the place (seriously, where did all of these seeds come from?).

Ever so gentle I wiggled one of the plants free from its growing spot, checked that the main root was not damaged, and replanted it into a pot filled with good quality compost.


I sat the potted tomato seedling in the greenhouse, and it seemed to grow before my eyes. After what seemed like a few days it grew so large it needed a stick to bare its weight.


The tomato plant grew, and it grew and it grew.


Until finally, one day when I checked it, I discovered that those tiny yellow flowers had been replaced by these tiny green spheres...


Success! 

I might be one of the few people in Newcastle who will be feasting on home grown tomatoes this winter!

Sometimes in my garden, I do have a "win".

Sam xox

Tuesday, June 26, 2012

Greenhouse.

My first attempt at using a greenhouse happened last summer.The vegetable garden was coming along nicely, so I figured the next logical step would be to expand and begin sowing my seeds in a greenhouse, the seedlings could then be progressively planted out when required. Silly me still had so much to learn. I am known for the phrase "how hard can it be?" when considering/attempting DIY projects far beyond my skill set. This attitude has often left me floundering, with dear husband coming to my rescue to fix said project.

"Growing seeds in a greenhouse, how hard can it be?". 

Well, plenty hard when you combine summer days that are boiling hot , a very small plastic apparatus, and a sewer sower who has no idea what she is doing. Needless to say, I sowed an awful lot of seeds with nil result. It took longer than it should have for me to understand that by keeping the greenhouse closed up during the day, I was basically frying my seedlings to death - those that even sprouted in the first place!

Come winter and I have evolved. I have done some reading on the topic and even watched a few YouTube videos! So when I saw this gigantic plastic greenhouse in Aldi on special recently, I knew I just had to try sowing my winter crop...


This greenhouse is 190cm tall in the centre, meaning that I can stand inside it and work! I erected it myself and was quite proud to be doing all my sowing utilising the potting table my dear husband built for me recently.

Still so many lessons were to be learnt though. We had a huge storm (as in the worst in 6 years) which blew the whole thing completely over (seed trays flying everywhere, sob), so I had to start from scratch again. Then I realised that any wind shakes the structure, causing the shelves to vibrate which eventually leads to the trays falling off (that's the second tray of poppy seeds gone - and they take 24 weeks to flower! Oh how my heart broke just a little). I still am yet to work out quite how to prevent the vibrations happening, though Jamie has suggested cable tying the trays down, which I am hopeful will work when I give it a try on Friday.

Now, as we move to the second half of winter, when I fear time is running out, my efforts are finally being rewarded...

~ A tray containing a collection of the second batch of fallen seeds... no idea what these are yet ~

~ Beautiful baby basil ~

~ Broccoli and cauliflower seedlings doing well ~

~ All that was salvaged from the first fall, a mix of broccoli, cauliflower, and a couple of rouge tomato plants I found growing in my pots ~

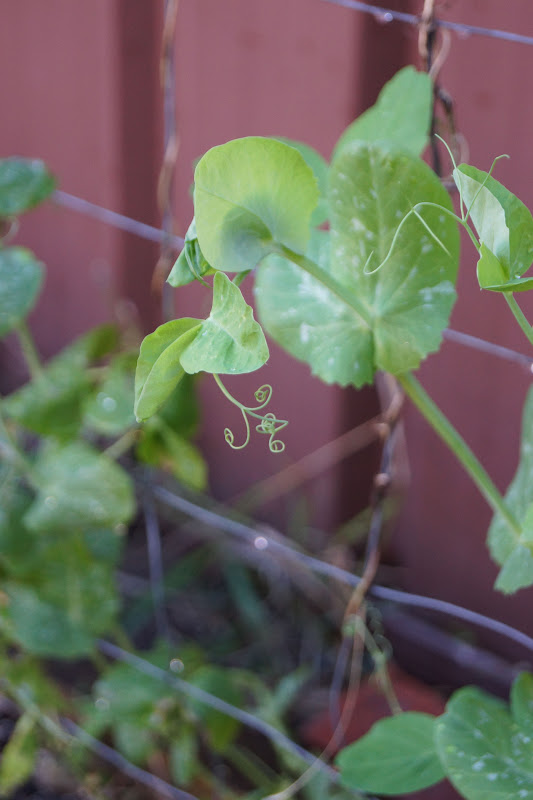
~ Snow peas perfectly grown and ready for planting out ~

My snow peas germinated and grew to the above size within one week of planting. For comparison, I planted some of the seeds directly into the garden, and they are still yet to sprout. So my verdict? Greenhouses are brilliant! 

Sam xox